Monday, June 16, 2014

Fudge Puddles

If you like the taste of peanut butter and chocolate combined, then you'll love these! These little cookies are delectable, and they are beautifully presentable. Just make sure you have a melon-baller to make the wells, as it will make the whole process much easier. I came across this recipe on allrecipes.com.


Fudge Puddles

1/2 cup butter, softened
1/2 cup creamy peanut butter
1/2 cup white sugar
1/2 cup packed brown sugar
1 egg
1/2 teaspoon vanilla extract
1 1/4 cups all-purpose flour
3/4 teaspoon baking soda
1/2 teaspoon salt

1 cup milk chocolate chips
1 cup semi-sweet chocolate chips
1 (14 ounce) can sweetened condensed milk
1 teaspoon vanilla extract

1. Preheat oven to 325 degrees F (165 degrees C).
2 . Sift together flour, baking soda and salt.
3. Cream butter, peanut butter and white and brown sugars. Mix in egg and 1/2 teaspoon vanilla. Stir the flour mixture into creamed mixture. Shape the dough into 48 balls, 1 inch each.
4. Place each ball in one compartment of a mini muffin tin.
5. For filling, put chocolate chips in a double boiler over simmering water. Stir in milk and vanilla, mix well.
6. Bake for 14 to 16 minutes or until lightly browned. Remove from oven and immediately make wells in the center of each using a melon-baller. Cool in pan for 5 minutes. Then carefully remove to wire racks. Using a measuring cup fill each shell with the chocolate mixture.

Sunday, June 15, 2014

Green Breakfast Smoothie

The idea of a green smoothie is brilliant, right?  Get so many veggies in all at once, and you're set for the day.  All the green-smoothie lovers swear up and down that "you can't even taste the spinach!"

Well, I'm here to tell you that's a lie.  It's a scam that I fell for myself.  Either that, or I just have ultra-sensitive taste buds.  I tried just about every green smoothie concoction in the books, and let me tell you - you CAN taste the spinach, and spinach goop is just as bad as it sounds.

I was skeptical when Mel posted this recipe on our blog.  However, she's never steered me wrong when trying recipes on her site, so I decided to give this one a whirl.  I went into it with a bad attitude, certain it would be awful.


Boy was I wrong, I love this smoothie!  I can taste the spinich just a tiny bit, but it is mostly diluted with a sweet, citrusy, fresh flavor.  I usually just make half this recipe, since it's just me eating it most of the time, but I figure I get about 2 servings of fruit and 1 serving of veggies.  Not bad for 8:00 in the morning!


Green Breakfast Smoothies
Recipe from Mel's Kitchen Cafe

Ingredients:
  •     1 cup 100% carrot juice
  •     1 orange peeled
  •     1/2 lime peeled
  •     1 soft, ripe pear, cored and cut into quarters
  •     1 to 2 handfuls fresh spinach
  •     1 frozen banana
  •     1 cup frozen blueberries or strawberries
  •     1-2 tablespoons ground flaxseed or chia seeds (optional)
Directions:

Combine all the ingredients in a blender and process until smooth (it works best to combine them in the order listed - liquids at the bottom, frozen at the top).

Oatmeal Applesauce Muffins

Breakfast has always been a struggle for me.  I've never been a big fan of cold cereal, and I'm usually on the go in the morning - so I find myself often questioning what I can eat.  This has led to some pretty awful eating habits.  In an effort of full disclosure, here are some of the stages I've been through in my lifetime of breakfasts:
  • Toaster Strudels, Pop-tarts, and Nutrigrain bars (gotta love those processed, sugary foods!)
  • Doughnuts from the local bakery (hello extra 20 pounds in one year)
  • Carnation Instant Breakfast or Slim Fast (I'm starving, and I've still got 3 more hours till lunch)
  • What did we eat last night for dinner - is there anything leftover that I can have for breakfast?
  • I'm sooooo tired, and need sugar now!  Cookies, cake, and brownies - yes, yes, and yes. 
  • Why the duece is it so bloody cold in Chicago this morning?  Why hello starbucks, I would love a piping hot chocolate. 
  • Forget it - I'm going back to bed.  I'll just skip breakfast today.  
I really think breakfast sets the tone for my whole day.  If I have any of the above breakfasts, I think to myself "screw-it" when it comes to making healthy choices for the rest of my meals.

Therefore, I've really been making an effort to find quick, healthy breakfasts.  I've found some success over the past few months - but honestly, oatmeal and spinach smoothies are not nearly as good as the bakery down the street.  I guess that's life. 

However, these muffins are close.  They are perfect balance of healthy ingredients, with just a bit of sugar and butter to make them appetizing.  I make a batch on Monday, and they last me for the whole week.  They also freeze well. 


Oatmeal Applesauce Muffins
Recipe from Mel's Kitchen Cafe

Ingredients:
  • 1 cup rolled/old-fashioned oats
  • 1 cup unsweetened applesauce
  • 1/2 cup milk
  • 1 large egg
  • 1 teaspoon vanilla
  • 4 tablespoons butter or coconut oil, melted
  • 1/3 cup sugar
  • 3/4 cup whole wheat flour
  • 1 teaspoon baking powder
  • 1/2 teaspoon baking soda
  • 1 teaspoon cinnamon
  • 1/4 teaspoon salt
  • 1/2 cup dried cranberries or raisins, optional
Directions:
  1. Preheat the oven to 375 degrees F. Line a 12-cup muffin tin with liners or grease the muffin cups. Set aside.
  2. In a medium bowl, stir together the oatmeal, applesauce, milk, egg, vanilla, butter and sugar. Set aside.
  3. In a large bowl, whisk together the flour, baking powder, baking soda, cinnamon and salt (and cranberries or raisins if using). Make a well in the center and pour in the applesauce mixture. Stir until just combined (don't overmix or the muffins will be dense and dry). The muffin batter texture might be a bit different (wetter?) than other muffin batters but no fear, carry on!
  4. Distribute the batter evenly among the 12 muffin cups. Bake for 15-20 minutes until a toothpick inserted in the center comes out clean. Don't overbake or the muffins will be dry.
  5.  Remove the muffins to a rack to cool completely. Once cool, I place 6-9 muffins in a large freezer ziploc bag, suck all the air out (oh yes I do) and seal the bag, then freeze, pulling them out one by one to stick in my kids lunches or warm slightly for a snack.

BBQ Chicken Pizza

We try to grill-out frequently during the summer, as our house can get so warm and muggy this time of year.  This is one of our favorite weeknight dishes.


BBQ Chicken Pizza

Ingredients:
  • 1 pizza dough recipe (this one is awesome)
  • 1/2 cup barbeque sauce (KC Masterpiece works great for grilling)
  • 2 chicken breasts, cooked and shredded
  • 1 cup sharp cheddar cheese
  • 1 cup mozzarella cheese
  • Pinch of dried parsley
Directions:
  1. Make your favorite pizza dough. Typically you'll want to split your dough in half and make two smaller pizzas, as smaller crusts are a bit easier to work with on the grill. 
  2. Roll your pizza dough into a thin circle, and liberally spread olive oil on top of it. 
  3. Place the rolled-out pizza dough on the grill, oiled side down (this prevents it from sticking).
  4. Grill for 2-3 minutes, or until light grill marks start to appear.*
  5. Remove the pizza crust, and place it grilled-side up onto a greased cookie sheet (you'll be placing the toppings on top of the grilled side).  
  6. Layer barbeque sauce, chicken, cheese, and parsley.
  7. Return pizza to grill and finish cooking, about 2-3 minutes or until grill marks start to form on the bottom of the crust.*
*Hint:  Sometimes, the dough will get the grill marks quickly, but may not be fully cooked inside.  For this reason, I make sort of a grid pattern on the dough -- place dough on the grill for 2 or 3 minutes, and then move the dough 180 degrees for another 2-3 minutes. 

Twice-Baked Potatoes

Every year, Alex makes his mother and me a delicious steak dinner for Mother's Day.  Everything always turns out delicious, but I think these twice baked potatoes are my favorite thing on the plate.  These are actually better than the ones from nice steakhouses!


Twice-Baked Potatoes
Recipe from one of Alex's old roommates (but who?)

Ingredients:
  • 6 large potatoes
  • 1 C. onion sour cream dip (I just add onion powder to sr. cream)
  • 6 to 8 T. milk
  • ½ t. celery salt
  • ¼ t. pepper
  • 2 C. shredded cheese  (I use sharp)
  • 2 T. chopped gr. onion
  • 2 T. crumbled cooked bacon
 Directions:
  1. Bake potatoes as you usually would, then cut off the tops lengthwise, a little higher than halfway up, to keep the potato skins in tact.  Scoop out the potato pulp into a mixer bowl.  Add sr. cream, milk, celery salt, pepper and half of cheese to potatoes.  Beat at low speed with electric mixer until blended.  (sometimes I add extra butter or softened cream cheese to add flavor)  Turn mixer to high speed – beat just until fluffy.  Do not overbeat. 
  2. Spoon mixture back into shells.  Place in 9X13” baking dish and sprinkle with remaining cheese, gr. onions and bacon.  Bake at 425 degrees for 15-20 minutes.

Mormon Tiramisu

Alex made this for Mother's Day, and boy howdy, this a good dessert!  Keep in mind I've never had tiramisu before, so I can't tell you if it tastes anything like the real thing - but this version most definitely will not disappoint the taste buds.  I think I'll be requesting this in lieu of birthday cake in a few months.  :-)


Mormon Tiramisu
Recipe from Mel's Kitchen Cafe

Ingredients:
  • 1 ½ cups good-quality hot chocolate, made with water and using 1 ½ times the hot chocolate powder
  • ½ teaspoon rum extract
  • ½ tablespoon pure vanilla extract
  • 4 large egg yolks
  • ½ cup granulated sugar
  • 1/8 teaspoon salt
  •  ¼ cup heavy whipping cream
  • 8 ounces mascarpone cheese (can sub cream cheese in a pinch)
  • ½ cup heavy whipping cream
  • About 36 crisp ladyfingers cookies/biscuits
  • 1 tablespoon natural cocoa powder
Directions:
  1. Make the hot cocoa according to the instructions above – using water instead of milk and using 1 ½ the amount of hot chocolate powder you would normally use to make a cup for drinking. Allow the hot cocoa to cool while you are preparing the rest of the recipe. Once it is lukewarm, add the vanilla and imitation rum extract. Due to the high cocoa to water ratio, whisk the cocoa mixture frequently to keep the cocoa suspended.
  2. Set a medium saucepan over medium heat and fill with about 1-2 inches water. Let it come to a simmer while you proceed with the recipe. In a medium bowl (an appropriate size to be placed on the pan that is heating), beat the egg yolks at low speed with a mixer (hand or electric) until just combined. Add the ½ cup sugar and salt and beat at medium-high speed until pale yellow, 1 1/2 to 2 minutes, scraping down the bowl with a rubber spatula once or twice. Add ¼ cup cream to the yolks and beat at medium speed until just combined, 20 to 30 seconds; scrape the bowl. Set the bowl with the yolks over the saucepan of water that has come to a simmer. Cook the egg yolk mixture, stirring constantly and scraping along the bottom and sides of the bowl with a heatproof rubber spatula, until the egg yolk mixture coats the back of a spoon, about 4 to 7 minutes. Remove the bowl from the heat and stir vigorously to cool slightly, then set aside to cool to room temperature, about 15 minutes.
  3. Add the mascarpone cheese to the cooled mixture and beat at medium speed until no lumps remain, about a minute. Transfer the mixture to a large bowl and set aside. In the now-empty bowl (no need to clean the bowl), beat the ½ cup heavy whipping cream at medium-high speed until stiff peaks form. Using a rubber spatula, fold 1/3 of the whipped cream into the mascarpone mixture. Then gently fold in the remaining whipped cream until no white streaks remain. Set the mixture aside.
  4. Give the hot cocoa mixture a good whisk to combine. Pour it into a shallow baking dish like a pie plate. Dip 1 ladyfinger into the hot cocoa at a time, allowing it to soak up the hot cocoa for about 1-2 seconds per side. Transfer each ladyfinger immediately to an 8-inch square baking dish. Lay the cookies side-by-side to create one even layer. You may have to trim/break the soaked cookies to fit the pan. After finishing the first layer of ladyfinger cookies, spread half of the mascarpone cream mixture evenly over the ladyfingers, spreading to the edges of the pan. Using a small fine-mesh strainer, sprinkle 1/2 tablespoon of the natural cocoa powder over the mascarpone layer.
  5. Repeat the soaking process with the ladyfingers, creating one more layer of ladyfinger cookies over the mascarpone/cocoa layer. Spread evenly with the remaining mascarpone mixture. Dust with the final 1/2 tablespoon of natural cocoa powder. Refrigerate for at least 4 hours to chill and set. This can be made up to 1 day in advance. Cut into squares and serve.

Saturday, May 31, 2014

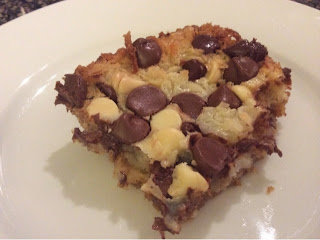
Magic Cookie Bars (aka Hello-Dolly Bars)

My sister, Julie, introduced me to these delicious cookie bars while I was visiting her in Pittsburgh a couple of years ago. I believe this is a common recipe that gets circulated throughout the Mormon community, as I've come across it many times at church functions, potlucks, and the BYU-Idaho cafeteria.


This is probably the most requested dessert from Alex. There are many variations to this recipe, but here is what I find works best.

Magic Cookie Bars


Ingredients:
  • 1/2 cup butter (1 stick), melted
  • 2 cups graham cracker crumbs (this equals about one of the packets in a box of graham crackers)
  • 1 (14 oz.) can sweetened condensed milk
  • 1 1/2 cups coconut
  • 1 cup milk chocolate chips
  • 1 cup semi-sweet chocolate chips
  • 1/2 cup white chocolate chips
  • (Nuts and butter scotch chips can also be added, if desired)
Directions:
  1. Preheat oven to 350. Spray an 8 x 11 glass pan.
  2. Combine melted butter and graham crackers crumbs. Press mixture into the bottom of the pan.
  3. Pour sweetened condensed milk over graham cracker crust.
  4. Sprinkle coconut evenly over sweetened condensed milk.
  5. Sprinkle chocolate chips over coconut (and nuts, if desired).
  6. Bake at 350, for 20 minutes, or until the edges become brown. Let cool completely before cutting into squares. Makes about 12-15 servings.

Wednesday, May 28, 2014

Brownies

This is our favorite brownie recipe.  So much better than making brownies from the mix, and only a few extra steps.  We use the suggested recipe on the back of the Hershey's cocoa powder container, but use Cadbury's Bournville cocoa powder instead.  They are divine!

Brownies
Recipe from Hershey's
  • 1 cup (2 sticks) butter or margarine, melted
  • 2 cups sugar
  • 2 teaspoons vanilla extract
  • 4 eggs
  • 3/4 cup baking cocoa
  • 1 cup all-purpose flour
  • 1/2 teaspoon baking powder
  • 1/4 teaspoon salt
  • 1 cup chopped nuts (optional)
Directions:
  1. Heat oven to 350°F. Grease 13x9x2-inch baking pan.
  2. Place butter in large microwave-safe bowl. Microwave at MEDIUM (50%) 2 to 2-1/2 minutes or until melted. Stir in sugar and vanilla. Add eggs, one at a time, beating well with spoon after each addition. Add cocoa; beat until well blended. Add flour, baking powder and salt; beat well. Stir in nuts, if desired. Pour batter into prepared pan.
  3. Bake 30 to 35 minutes or until brownies begin to pull away from sides of pan. Cool completely in pan on wire rack.  Cut into bars. Makes about 24 brownies.

Mom's Banana Bread

This is a recipe I never truly appreciated growing up.  Maybe its because my mom always added nuts, and I'd prefer my banana nut bread nut-free.  In my adult life, I've had the opportunity to sample many other people's banana bread.  In doing so, I couldn't believe how spoiled I was growing up with this recipe - it is so much better than anything else out there!  My mom is a banana bread genius!

 
 Sometimes I purposely buy bananas I know we won't eat, so when they get super ripe - I have no choice but to make banana bread.  I wouldn't want to be wasteful and throw them out, right?  :-)

 Mom's Banana Bread
From the kitchen of Carol Hutchins

Ingredients:
  • 1/3 cup milk
  • 1 tsp lemon juice
  • 1/2 cup butter
  • 1 cup sugar*
  • 2 eggs
  • 1 cup mashed ripe bananas (about 2-3)
  • 2 cups flour
  • 1 tsp baking soda
  • 1/2 tsp salt
 Directions:
  1. Preheat oven to 350.  Grease 3 mini loaf pans.
  2. In a measuring cup, squeeze lemon juice into milk and let sit for 5 minutes to curdle. 
  3. In a small bowl, whisk together flour, baking soda, and salt.  
  4. In a large mixing bowl, combine melted butter, sugar, eggs, and mashed bananas.  Slowly alternate adding lemon/milk mixture and flour mixture to the bowl.  Mix until combined. 
  5. Bake at 350, for 30-35 minutes.  Remove from pans and cool. 
*Tip:  If your bananas are really ripe, you can reduce the sugar to 3/4 cup.  

Maddox Rolls

Growing up, we used to frequent a steakhouse in Perry, Utah called Maddox.  I have so many childhood memories there. We used to go there with our grandparents, or go as a treat for getting good grades, and we even held my grandma's memorial service there.  Maddox and my family go way back, I think my Grandma was even friends with the origional owner. 

My favorite part of Maddox is their rolls.  Anyone who has been there will first comment on how amazing they are.  I had a dream about them on Sunday (yes, I dream about food), so when I woke up, I diligently began looking for a copy-cat recipe online.  I came across this one, and it did not disappoint.  I would say these are about a 90% match.  Mine aren't quite as pretty, but they taste nearly the same. 


Maddox Rolls
Recipe adapted from Clawson Live

Ingredients:
  • 2 Tablespoons of yeast (not rapid rise)
  • 1/2 cup of warm water
  • 1 1/2 teaspoon of salt
  • 2 cups whole milk
  • 1/2 cup (or 4 ounces) of  butter
  • 1/2 cup of granulated sugar
  • 3 large eggs
  • 5 1/2 cups of all-purpose flour
Directions:
  1. In the microwave, melt the butter, milk, and salt for two minutes.  Remove from the heat and add two cups of flour.
  2. While cooling, mix the yeast and warm water in a measuring cup.  Add a pinch of sugar from the 1/2 cup measure and stir.  Let the yeast sit and proof for a few minutes.
  3. In a large bowl, mix the yeast mixture, eggs, sugar, milk/butter mixture and remaining 3 1/2 cups of flour just until blended and no lumps of flour remain.  Do not over mix.  The dough will be sticky and very loose.
  4. Let the batter/dough raise until double in size.
  5. Preheat the oven to 375 degrees F.  Spoon it into greased muffin tins and let it raise again until doubled in size. 
  6. Bake for 12-15 minutes or until the rolls are golden brown.
  7. Cool on a wire rack.  Serve with honey or raspberry butter.
  8. This recipe makes about 24 dinner sized rolls.
Raspberry Honey Butter:
  • 1 cube butter (1/2 c.)
  • 1/2 c. honey
  • 1/4 c. raspberry jam
  • 1 t. vanilla
Whip the living daylights out of this until it is super fluffy.  Don't start with melted butter.  Room temp is great.

Jerk Chicken Salad

I had this salad at a Pampered Chef party with Amy several years ago, and it's a great combination of flavors.  We have about 2-3 dinner salads we rotate through, but I'm always looking to add more.  We get tired of salad so easily, so this one helps to keep the interest in eating our greens.  Plus, there isn't much better in life than grilled pineapple! 


Jerk Chicken Salad
Recipe adapted from Pampered Chef

Ingredients:
  • 1 tablespoon olive oil
  • 1 tablespoon Jamaican Jerk Rub
  • 1 pound chicken tenders
  • 1 medium pineapple
  • 1 red bell pepper
  • 3 green onions (white and light green parts only)       
  • 2 heads romaine lettuce
  • 1/2 can black beans, drained
  • 6 slices bacon, cooked, drained and crumbled
For the dressing -
  • 2 limes
  • 1/3 cup reduced-fat mayonnaise
  • 2 tablespoons preserves (I like raspberry or strawberry)
Directions:
  1. Whisk together oil and jerk rub with Stainless Whisk. Add chicken tenders; mix well to coat and set aside. Slice pineapple into 1/4 inch slices. 
  2. Heat Grill Pan over medium heat 5 minutes. Add chicken; cook 3-5 minutes on each side, turning once. Remove from pan. Add pineapple to pan. Cook 1 minute on each side, turning once; remove from pan. 
  3. Thinly slice bell pepper and green onions. Chop remaining lettuce; set vegetables aside. Drain and rinse beans.
  4. For dressing, zest one lime and juice both limes into small bowl. Add mayonnaise and fruit preserves to bowl; mix well.
  5. Layer chopped lettuce, beans, bell pepper, chicken, pineapple, bacon and green onions. Drizzle dressing over salad.

Bourbon Cremes

Last month, we were invited to a British-themed party with some friends from church.  Everyone there had either lived in England, or visited.  We were all asked to bring a British dish, so I decided to make Bourbon Cremes (along with my Yorkshire Pudding of course!).  Although I had never had them during my visits to England, I had pinned the recipe from the Tesco website a while ago, and thought this was a perfect opportunity to try them out (Tesco is a major grocery chain in the UK, much like Safeway is here in the US).

This recipe was a bit of a challenge at first.  For one thing, I had to track down Golden Syrup, which is a common household baking staple in England.  Luckily, our local grocery store has a great international foods section (thanks Meijer!), so I was able to find it without too much difficulty.

Secondly, England uses the metric system for their recipes, so I had to adapt the ingredient proportions with my trusty food scale.  Unfortunately, the dough didn't look right even though I measured everything out precisely.  It was far too sticky.  So I added a little more of the ingredients here and there, until I got the dough to look and taste just right.

These were a hit!   Everyone raved about them, and the golden syrup added such a unique taste.  I loved these because they weren't too sweet or rich.  They were gobbled down at the party in no time.

I was craving them a few days later, so I made them again and kept track of the proportions so I could post the recipe here.  Unfortunately, I was out of my favorite Cadbury Bournville Baking Cocoa, so I used the Hershey's cocoa I had on hand.  They still turned out pretty good, but weren't quite as tasty.  Needless to say, I promptly ordered some more Cadbury Cocoa to restock my pantry.  

Bourbon Cremes
Recipe adapted from Tesco

Ingredients:

For the biscuits -
  • 1/2 cup butter
  • 6 tablespoons brown sugar
  • 2 tablespoons golden syrup
  • 2 tablespoons baking cocoa
  • 1 tsp baking soda
  • 1 1/4 cup all-purpose flour
For the icing -
  • 5 tablespoons butter, softened
  • 1 teaspoon vanilla
  • 1 teaspoon milk
  • 2 tablespoons baking cocoa
  • 1 1/3 cup powdered sugar
Directions:

For the biscuits - 
  1. Heat the oven to 350. Line two baking sheets with parchment paper.
  2. Using a hand mixer beat butter and sugar together until combined, then beat in the golden syrup.
  3. In a separate bowl sift the flour, baking soda and cocoa powder. Fold through the butter mixture then bring together to form a dough.
  4. Using a small cookie scoop, form dough into balls and place on cookie sheet about 2 inches apart.  Dip the end of a cup into flour, and gently press down on dough balls to flatten. 
  5. Bake for 10 minutes. 
  6. Leave to cool on the trays while you make the filling. 
For the icing -
  1. Sift the powdered sugar and cocoa powder together. Add the butter and vanilla and beat together with an electric hand mixer until soft and creamy. Stir through the milk.
  2. When the biscuits are completely cooled use a knife or piping bag to cover one side with the icing, then sandwich with another biscuit.

Sweet-and-Sour Chicken

One of my roommates at BYU, Brittany (Renshaw) Bitner, is one of the best cooks I have ever known. She can make anything, and make it well. She gives credit to her mom, but I think cooking/baking is one of her many, many talents.


Beautiful Brittany on her wedding day 

Not only is she an exceptional cook, she was also a terrific roommate. She put up with a lot in the two years she lived with me! Anyway, one night she said she wanted to make me dinner and asked what I would like. Wanting to give her a challenge, I asked for sweet-and-sour chicken. She replied with, "No problem, I have a great recipe for that!"


And it was a great recipe! I honestly like her sweet-and-sour chicken better than what is offered at any Chinese food restaurant around. Thanks Brittany!

Sweet-and-Sour Chicken
From the kitchen of Brittany Bitner

Ingredients:
  • 3 Tbsp. soy sauce
  • 1 egg
  • ¼ tsp. pepper
  • ¼ tsp. garlic powder
  • 1 Tbsp. cornstarch
  • 1 lb. skinless chicken breasts cut into 1 inch pieces
  • ½ C. vegetable oil
  • 1 15-oz can of pineapple chunks w/ juice
  • 2 T cornstarch
  • ½ C sugar
  • ¼ C ketchup
  • ¼ C vinegar
  • 1 T soy sauce
  • 1 green pepper cut into 1 inch pieces
  • 1 medium onion cut into 1 inch pieces
  • Hot cooked brown rice
Directions:
  1. Heat oil in skillet to about 375 degrees.
  2. In a medium mixing bowl, combine the first 5 ingredients. Add chicken, stirring to coat.
  3. Place each piece of chicken in heated oil, and fry until cooked all the way through.
  4. In a measuring cup, drain pineapple to reserve liquid. Add enough water to juice to make 1 cup. Then add cornstarch, stirring well.
  5. Combine pineapple, juice mixture, sugar, ketchup, vinegar, and soy sauce in a medium saucepan; bring mixture to a boil.
  6. Add green pepper, onion, and chicken to sauce. Cook until thoroughly heated.
  7. Serve over rice. Serves 4-6.

Roasted Glazed Carrots

Here is another recipe inspired by a dish I love at Redstone.  These are so sweet and buttery, I could eat them for dessert. A great way to make carrots less healthy.  :-)


Glazed Carrots
Recipe adapted from Martha Stewart 

Ingredients:
  • 2 tablespoons extra-virgin olive oil
  • 3 tablespoons spicy mustard
  • 3 tablespoons packed light-brown sugar
  • 1/8 teaspoon cocoa powder
  • 1 tablespoon cider vinegar
  • 2-3 pounds medium carrots, cut into 2 1/2-inch pieces
  • Coarse salt and ground pepper to taste
  • 2 tablespoons unsalted butter
Directions:
  1. Preheat oven to 450 degrees, with rack in middle. Line a baking sheet with tinfoil, and spray generously with non-stick spray.
  2. In a small bowl, whisk together oil, mustard, brown sugar, cocoa powder, and vinegar. 
  3. Toss carrots with mustard mixture. Season with salt and pepper. 
  4. Arrange vegetables in a single layer and roast until they are beginning to brown and are tender when pierced with a knife, about 30 minutes, stirring halfway through. 
  5. Stir in butter and serve warm.

Jalapeno Cornbread

Honestly, if you only ever make one thing on my blog - this should be it.  It is one of my all time favorite recipes.  

I'm a bit of a cornbread snob.  My family was big on cornbread growing up, and I'm sure I've tried just about every variety out there at some point - Jiffy, Marie Calander's, bisquick, etc.  The mixes are okay if you're in a pinch, but none of those even come close to comparing to this recipe.  This is truly a gourmet sensation.


I originally had this cornbread at my favorite restaurant, RedStone.  I would crave it often, but being as its a bit pricey ($4/slice), I decided to look for a copy cat recipe online.  I found it here, and this truly is a 100% match in terms of taste, texture, and presentation.   Please oh please oh please do not skip the maple butter - it takes this cornbread from downright delicious, to an out-of-body experience.  Have I talked it up enough?  Try it, you won't regret it. I promise.  

Jalapeno Cornbread
Recipe from Food.com

Ingredients:
  • 3/4 cup cornmeal
  • 3/4 cup all-purpose flour
  • 1/4 teaspoon salt
  • 1 1/2 tablespoons baking powder
  • 4 eggs
  • 3/4 cup sugar
  • 7 ounces creamed corn (1/2 can)
  • 2 ounces diced green chilies, drained well (1/2 can)
  • 1/2 cup butter
  • 1/2 cup shredded Monterrey Jack and cheddar cheese blend
For the Maple Butter
  • 1/2 cup butter (1 stick), softened
  • 1/4 cup maple syrup
Directions:
  1. Preheat oven to 400°F.
  2. Mix together all ingredients in the order given.
  3. Pour into greased 8" or 9" iron skillet, 9x9 pan, or 10" round cake pan.
  4. Bake 35 minutes. Insert toothpick- if it comes out clean the corn bread is done. If not, continue baking & check every 5 minutes with a toothpick.
  5. Serve warm with Maple Butter.
 For the Maple Butter:
  1. Allow butter to soften to room temperature.
  2. In mixer, (use a paddle attachment if available) whip butter until fluffy.
  3. Slowly drizzle syrup into mixture until well blended.
Tip: To give the cornbread a nice crusty top, mixed about 1 tablespoon of softened butter with 2-3 tablespoons of brown sugar, and sprinkle on top before baking.

Thursday, March 27, 2014

Mashed Sweet Potatoes

I didn't like sweet potatoes until I was served them in "mashed" form at one of our favorite restuarants, Redstone.  I have since attempted to recreate this yummy dish with the recipe below.  I added a yummy sugary topping, because streusel.  I think this will become a regular dish at our Thanksgiving table.


Mashed Sweet Potatoes
Recipe adapted from Top Secret Recipes 

Ingredients:
  • 3-4 large sweet potatoes
  • 2/3 cup brown sugar
  • 6 tablespoons butter
  • 1/2 teaspoon salt
  • 1/2 teaspoon ground cinnamon
  • 1/4 teaspoon allspice
  • 1/4 teaspoon ground nutmeg
For the Topping:
  • 1 tablespoon butter
  • 1/3 cup pecans
  • 1/4 cup rolled oats
  • 2 tablespoons cornflakes or rice krispie cereal
  • 2 tablespoons brown sugar
  • 1/2 teaspoon ground cinnamon
Directions:
  1. Fill large stockpot with water, and bring to a boil.  Meanwhile, peel and cube raw sweet potatoes. 
  2. Boil sweet potato cubes for 20-30 minutes, until tender.  Drain, and beat with a hand-mixer until desired consistency.  Immediately mix in remaining ingredients.  
  3. In a food processor, grind pecans, rolled oats, and krispie cereal until mixture resembles coarse crumbs.  Melt one tablespoon butter in small saucepan, and add crumbly mixture.  Cook over medium heat for 3-5 minutes to bring out the flavor.  Remove from heat, and mix in brown sugar and cinnamon. 
  4. Serve sweet potatoes, and top with crumbly streusel topping. 

Fajita Pitas

This is a simple week-night meal that I learned in my Home Economic class in high school. 


Fajita Pitas 
Recipe from my home economics class in high school

Ingredients:
  • Pita Sandwich Bread
  • Shredded Chicken 
  • Taco Seasoning
  • Shredded Cheddar Cheese
  • Lettuce
  • Sliced Tomato
  • Sour Cream
  • Diced Avocado
Directions:

In a saucepan over medium heat, heat shredded chicken, a few tablespoons of water, and taco seasoning to taste.  Stuff pita bread with seasoned chicken, cheese, and whatever other ingredients you prefer.   

The BEST Chocolate Chip Cookies Ever

I have tried many, many, many chocolate chip cookie recipes over the years, hoping to find the best one.  I grew up on the traditional Nestle Toll House cookies, and while good, they left me longing for more. 

Thus began the cookie-making exploration.  In the past, I have found success with Alex's cookie recipe, and also cookies where you add a vanilla pudding mix into the dough.  Both are fantastic, but they honestly don't compare to these cookies. 


These cookies were a result of a fantastic girl's weekend with my good friend, Lauren.  She came to Chicago for a food blogging convention, and invited me to hang-out with her downtown.  We stayed in The Wit Hotel, a Double Tree Hotel.  Upon checking in, they offered us a warm chocolate chip cookie.  It was the best cookie either of us had ever had.  I came to find out that all Double Tree hotels offer warm cookies upon arrival, and that you can ask for more than one whenever the mood strikes you during your stay.  Needless to say, many warm chocolate chip cookies were consumed during that weekend.  


I came home and scoured the inter-webs for a copy cat recipe, and found this one.  I was skeptical, because no cookie could be as good as the real thing, but boy were we wrong.  This cookie is fabulous!  I crave them approximately 1,896 times a day. 

I usually don't like nuts in my cookies, but these are ground up, so you can hardly taste them - and they add a nice texture and flavor to the cookie.  Don't omit the nuts, trust me on this one. 

The BEST Chocolate Chip Cookies
Recipe adapted from Food Geeks

Ingredients:
  • 1/2 cup rolled oats
  • 2-1/4 cups all-purpose flour
  • 1-1/2 tsp. baking soda
  • 1 tsp. salt
  • 1/4 tsp. cinnamon
  • 1 cup butter, softened
  • 3/4 cup brown sugar, packed
  • 3/4 cup granulated sugar
  • 1-1/2 tsp. vanilla
  • 1-1/2 tsp. lemon juice
  • 2 eggs
  • 3 cups semi-sweet, chocolate chips
  • 1-1/2 cups chopped walnuts
Directions:
  1. Grind oats in a food processor or blender until fine. Combine the ground oats with the flour, baking soda, salt and cinnamon in a medium bowl.
  2. Cream together the butter, sugars, vanilla, and lemon juice in another medium bowl with an electric mixer. Add the eggs and mix until smooth. Stir the dry mixture into the wet mixture and blend well. Add the chocolate chips and nuts to the dough and mix by hand until ingredients are well blended.
  3. For the best results, chill the dough overnight in the refrigerator before baking the cookies (I usually form the dough into rounded 1-inch balls using a cookie scoop, and then freeze.  You can pull them out of the freezer anytime, and cook as many as you'd like).
  4. Place rounded dough balls onto ungreased cookie sheet (I use parchment paper). Place the scoops about 2 inches apart. Bake in a 350°F oven for 14-17 minutes or until cookies are light brown and soft in the middle. Store in a sealed container when cool to keep soft.

Friday, March 21, 2014

Crescent Dinner Rolls

Not much is better than the smell of homemade bread. I've experimented with so many roll recipes, and this one has got to be my favorite.  I make these for Thanksgiving, funeral luncheons, and just about any other occasion that calls for buttery, fresh rolls.


Apparently, our dog Watson loves them too.  I made these the other day, and our whole house was filled with the most heavenly aroma.  Watson went into the kitchen, and started barking.  I followed him in to see what was the matter, and he pointed (with his snout) at the rolls cooling on the counter, and then to me, over and over again.  I finally gave in and let him sample a small bite.  He was one happy dog (I couldn't blame him!). 


Crescent Dinner Roles

Ingredients:
  • 1 1/2 cups of milk
  • 3/4 cup + 1 Tablespoon Sugar
  • 1 egg
  • 1 Tablespoon salt
  • 2 packets of rapid-rise yeast
  • 2 cups of warm water
  • about 9-10 cups of all purpose flour
  • at least 1 cup of butter
Instructions:
  1. Scald 1 1/2 cups of milk, 3/4 cup sugar and 1/2 cup of butter, in a microwave safe bowl, for about 2 minutes. Cutting the butter into pieces helps it melt faster. There will probably be some little cubes of butter still floating in the hot mixture, they will melt.   Remove from microwave, and stir in 2 cups of flour, then add 1 egg and 1 Tablespoon of salt; allow to cool for a couple of minutes.
  2. Meanwhile, In a glass measuring cup, dissolve 2 packets of rapid-rise yeast in 2 cups of warm water and 1 Tablespoon of sugar. Let it sit for 5-10 minutes until it is bubbly.
  3. Make sure your milk mixture is just warm, not boiling and add the yeast mixture.
  4. Using a fork or wooden spoon, gradually stir in 9-10 cups of flour (counting the flour you have already added to cool it earlier). I would recommend only adding 2 cups at time and stirring in between. These rolls turn out so much better when they are mixed by hand.
  5. At the end the dough will be dense and sticky, and may be hard to stir, you can use your hands to incorporate the rest of the flour if needed. Be sure not to add too much flour, as you want the dough to be just a bit sticky. Then smooth the dough out and place in greased bowl, cover with plastic wrap. Leave it in a warm place and let it rise until double in size.
  6. When your dough is close to raising completely, butter 2 cookie sheets and set them aside.
  7. Cover your working space with flour to prevent the dough from sticking. Dump your dough out and divide it into 4 balls. Eyeball the sizes, then lift them up and feel the weight of each ball. Try to make them even, but they don’t have to be perfect.
  8. Using one ball of dough at a time: roll the dough into a circle on a floured counter. Once it is rolled out spread the top with butter from edge to edge. You will use about 2 Tablespoons per circle of dough.
  9. Cut the dough circle into quarters using a pizza cutter. Then cut each quarter into 3 pieces. You should end up with 12 triangles from each circle of dough.
  10. Roll the dough starting with the wide end of the triangle
  11. Tuck the tail of the triangle under the roll and place it on the buttered cookie sheet. You will make 4 rows, with 6 rolls per row. This will give you 24 rolls per pan (making 48 rolls total).
  12. Pre-heat your oven to 350 degrees. Place the pans of rolls in a warm place (on top of the oven if possible) to let them rise. Once they are touching and full in size, cook (one pan at a time) in the oven ’till they are golden brown. About 10 – 15 minutes (mine took about 17 minutes). Keep a close eye on your first pan to get the right time for the second.
  13. While they are still hot and fresh out of the oven run a stick of butter over the tops of the rolls for a delicious buttery glaze.
*This link has great step-by-step pictures on how to make these rolls. 

Creamy Chicken Enchiladas

My sister introduced me to this fabulous enchilada recipe, and they are one of our favorite week-night meals.  Super easy to throw-together with shredded rotisserie chicken, and left-overs re-heat fantastically in the microwave the next day for lunch. 


Creamy Chicken Enchiladas

Ingredients:
  • 1 tablespoon butter
  • 1/3 cup chopped green onions
  • 1/2 teaspoon garlic powder
  • 1 (4 ounce) can diced green chiles
  • 1 (10.75 ounce) can condensed cream of chicken soup
  • 1/2 cup sour cream
  • 2 cups cubed cooked chicken breast meat
  • 1 1/2 cups shredded Monterrey Jack cheese, divided
  • 6 (12 inch) flour tortillas*
  • 1/4 cup milk
Directions:
  1. Preheat oven to 350 degrees. Lightly grease a large baking dish.
  2. In a medium saucepan over medium heat, melt the butter and saute the green onion until tender (about 3 to 4 minutes). Add the garlic powder, then stir in the green chiles, cream of chicken soup and sour cream. Mix well. Reserve 2/3 of this sauce and set aside. To the remaining 1/3 of the sauce in the saucepan, add the chicken and half of the shredded cheese. Stir together.
  3. Fill each flour tortilla with the chicken mixture and roll up. Place seam side down in the prepared baking dish.
  4. In a small bowl combine the reserved 2/3 of the sauce with the milk. Spoon this mixture over the rolled tortillas and top with the remaining half of the shredded cheese. Bake in the preheated oven for 30 to 35 minutes, or until cheese is bubbly.
*You want to use a thicker tortilla so that these hold up, like Guerro brand.  These don't turn out as well if you use the pre-cooked Tortilla Land brand, because they are thinner. 

Aunt Jerilee's Waffles

Let me tell you a little something about my Aunt Jerilee - she makes Martha Stewart look like an amateur.  Aunt Jerilee can do anything - she crafts like no one's business, raises chickens, sews, sings, plays several musical instruments, and so much more.  One of her greatest gifts is her ability to cook.  Enter, these life-changing waffles.

For the past ten years or so, we've spent the morning of either New Year's or Memorial Day at my Aunt Jerilee and Uncle Scott's house. We've been welcomed to an incredible spread of homemade jams, jellies, homemade hashbrowns, freshly squeezed juice, farm fresh eggs, home-cured deer bacon, sausage, fresh fruit, whipped cream, and these most fabulous waffles.  Its one of the highlights of our year, and we always look forward to it.

When we asked her for the recipe and she started explaining the process of aging buttermilk, we knew we were in over heads.  Luckily, she kindly adapted the recipe for me and Alex, and these bad boys have fit in nicely with our weekly Sunday brunches. 


Aunt Jerilee's Waffles
Recipe from the Kitchen of Jerilee Hutchins

Ingredients:
  • 2 eggs
  • 2 cups Buttermilk (Organic Buttermilk seems to be the closest you can get to aging your own)
  • 2 cups All-Purpose Flour
  • 2 teaspoons Baking Powder
  • 1 teaspoon Baking Soda
  • 1/2 teaspoon Salt
  • 1/4 cup + 2 tablespoons Shortening
Directions:

Heat waffle iron. Beat eggs; beat in remaining ingredients with rotary beater (or wire whisk) until smooth. Cook according to your waffle iron directions.

Lunch Lady Peanut Butter Bars

Alex and I are trying to eliminate sugar from our diets during the week, and save the sweets for the weekends.  Believe me when I say this is excruciating for us.  I'm used to making a dessert every evening to compliment dinner, and then we'd both eat any left-overs the next day.  I know that isn't healthy, and I was shocked when the World Health Organization recently recommended only eating 25 grams of sugar a day.  Since I was probably eating 3-4 times that many before, I knew I needed to make some changes. 


So last week was our first go-around on our new no-sugar-during-the-week-days plan, and many discussions were held about what treat we would make for the weekend.  We both decided it was time for some Lunch Lady Cookie Bars!

I was served these occasionally for a treat with lunch in elementary school.  They make a huge pan, so they are good for potlucks or family reunions.  By Sunday night, we had about half the pan left, so we figured we take the left-overs for friends.  They loved them too!


Lunch Lady Peanut Butter Bars
Recipe slightly adapted from Our Best Bites

Cookie Base:
  • 1 cup real butter (2 sticks) at room temperature
  • 1 cup granulated sugar
  • 2 cups brown sugar
  • 1  1/2 cups peanut butter, chunky or smooth
  • 3 eggs
  • 2 teaspoons vanilla
  • 1 1/2 teaspoons baking soda
  • 1/2 teaspoons table salt
  • 3 cups all purpose flour
  • 3 cups quick oats
  • optional: an extra 3/4 cup peanut butter, see notes in recipe below
Fudge Frosting:
  • 4 cups powdered sugar
  • 1/2 cup cocoa powder
  • 1/4 teaspoon table salt
  • 1/3 cup butter, softened
  • 1/3 cup boiling water
  • 1/2 teaspoon vanilla extract
Directions:
  1. Preheat oven to 350 degrees.  Spray a rimmed cookie sheet (standard half-sheet pan) lightly with non-stick spray and set aside.
  2. Cream butter and sugars for 2-3 minutes, until light and fluffy.  Add  peanut butter and vanilla and beat until combined.  Add eggs, one at a time and beat between each addition. Combine flour, baking soda, and salt and add mixture to dough.  Beat to combine.  Add oats and mix until incorporated.  Press dough into prepared pan into a flat layer.  Bake for about 15-20 minutes (mine took the whole 20 minutes).  The center should be puffed and set, but still soft. 
  3. While crust is baking, prepare frosting.  Whisk together powdered sugar, cocoa powder and salt.  Add butter (make sure it’s soft!), boiling water, and vanilla.  Beat until smooth and glossy.
  4. When cookie crust is done baking, if desired drizzle about 3/4 cups melted (just nuke it in the microwave) peanut butter on top and then spread on frosting.  Let cool (or leave slightly warm) and cut into squares to serve. 

Irish Beef Stew

I wanted to do something festive for St. Patrick's Day this year.  Janet had given us some some Irish Soda Bread and Green River to celebrate, and when Lauren posted this Irish Stew recipe on her blog - I knew we had a winner.

This beef stew is so good, I think it will become a regular in our dinner rotation. I was skeptical of the creamy mashed potatoes on the bottom, because they're made with cream cheese, but they are fabulous and your can't taste the cream cheese at all.

Traditional Irish Stew uses half beef broth, and half Guinness, but Guinness only sold in 12 packs and we don't drink.  I didn't want to find a place for 11 cans of beer in my house, so I followed Lauren's recipe and only used beef broth.  However, if/when I ever get my hands on a can of Guinness, you better believe it will be going into this stew. 


Irish Beef Stew

Ingredients:
  • 2 tablespoons olive oil
  • 1 lb. stew meat
  • 4 large carrots, peeled & chopped
  • 1 onion, diced
  • 2 cloves garlic, minced
  • salt & pepper, to taste
  • 1/4 teaspoon thyme
  • 1/4 teaspoon rosemary
  • 1 large bay leaf or 2 small
  • 3 cups beef broth
  • 2 tablespoons butter
  • 2 tablespoons flour
  • heaping 1/3 cup frozen peas
  • mashed potatoes (recipe found here)
Directions:

In large pot or deep skillet, brown stew meat in olive oil until browned on all sides, about 4 minutes. Pour in onions, carrots, garlic and spices. Cook another 5 minutes. Deglaze pan with beef broth. Cover and simmer 2-4 hours or until meat is very tender (mine only took 2 hours).  When you are ready to serve, remove bay leaf. In a small bowl stir softened butter and flour together until smooth and incorporated. Stir butter mixture into the stew with the frozen peas. Once the gravy thickens slightly, it's done. Serve hot over mashed potatoes.

Friday, March 14, 2014

Cheesy Biscuits

A friend from work, Brandi, got me addicted to Red Lobster.  When I worked at CEC, we'd go there frequently for lunch.  I don't even like any kind of seafood, but I do love their cheddar bay biscuits.  This recipe is not a 100% match, but is delicious nonetheless!  One of our favorite sides with a dinner salad. 


Cheddar Biscuits
Recipe adapted from GMA and Lauren's Latest

Ingredients:
  • 1 cup all-purpose flour
  • 2 teaspoons baking powder
  • 1/2 teaspoon salt
  • 1/4 teaspoon garlic powder
  • 1/3 cup cold butter, cubed
  • 1/2 cup grated sharp cheddar cheese
  • 1/2 cup milk
Topping:
  • 2 tablespoons butter, melted
  • ¼ teaspoon dried parsley flakes
  • ½ teaspoon garlic powder
  • pinch salt 
Directions:
  1. Preheat oven to 400 degrees. 
  2. Whisk dry ingredients together in a medium-sized mixing bowl. 
  3. Cut cold butter into small cubes, and then use a pastry knife to combine with dry mixture until coarse. 
  4. Add milk and shredded cheese, and mix just until blended (don't over mix).
  5. Using a cookie scoop, drop clumps of batter onto cookie sheet and bake for 15 minutes, or until golden brown around the edges and on top of the biscuits. 
  6. While baking, melt 2 tablespoons of butter, and add parsley, garlic powder, and salt.  Brush on top of cooked biscuits and serve immediately.

Mesquite Chicken Dinner Salad

This is a simple dinner salad, that was served to us at our good friend's house (the LaMonica's) a few years ago.  The combination of flavors work really well together. 


The trick is finding the Sweet Mesquite Seasoning.  We got this bottle from Costco a few years ago:


Mesquite Chicken Dinner Salad
Recipe from the kitchen of Laura LaMonica

Ingredients:
  • 2-3 Chicken Breasts (or 8-10 chicken tenders)
  • 2 tablespoons Olive Oil
  • 1 tablespoon Sweet Mesquite Seasoning
  • 1/2 cup Chopped Onion
Directions:
  1. Heat oil in non-stick skillet or grill pan over medium.  
  2. Add chicken breasts, chopped onion, and mesquite seasoning, and cook until chicken is done (about 5-7 minutes).
  3. Serve atop a garden salad (lettuce, tomatoes, cheddar cheese, croutons, salad dressing, etc.). 

Chicken Tostadas

My good friend and former co-worker, GeorgeAnne, made these for dinner one night, and brought the left-overs into work for her lunch the next day.  Oh my goodness, they smelled soooooooo good!  I kept commenting on how delicious they looked and smelled, in hopes of getting offered one.  Fortunately, my plan worked (or maybe Gigi just got tired of me hinting), and she shared a much-coveted tostada with me.  

The combination of flavors were just fantastic.  She married into a family that has Mexican ancestry, and I think that is where she learned how to make them.  I asked her for the recipe, and she gave me the "a couple shakes of this" and "a few spoonfuls of that" proportions, as well as the ingredients she used.  I came home, and pieced her directions together into in this recipe.  You can easily double or triple this if you're cooking for a crowd, and they make great left-overs.

The trick is finding the right ingredients.  These two may be hard to find:  Adobo All-Purpose Seasoning (the lemon pepper variety, the one with a yellow lid), and Chipotle Sauce.  Meijer is the only grocery store chain that carries the chipotle sauce around here, but you can usually get it at any Mexican specialty grocery store.  


Chicken Tostadas
Recipe from GeorgeAnne Ramirez

Ingredients:
  • 2-3 boneless chicken breasts
  • 1 onion, cut in half
  • 2 teaspoons of Adobo All-Purpose Seasoning (about 20 shakes)
  • 3 tablespoons chilpotle sauce (or more if you like it spicy) 
Toppings:
  • corn tostada rounds
  • lettuce
  • tomatoes
  • sour cream (this helps off-set the spiciness)
  • cheddar cheese, shredded
  • avocado
Directions:
  1. Fill stock pot with water (about 6 cups), and bring to a boil.
  2. Drop chicken breasts, Adobo seasoning, and onion halves into boiling water, and cook until chicken is done (about 5-7 minutes). 
  3. Remove chicken from boiling water, and shred (you can discard the onions and water). 
  4. Place shredded chicken into a non-stick skillet, and add 2-3 tablespoons of chipotle sauce (more or less, depending on your preference for spiciness). 
  5. Spread sour cream on tostada round, top with chicken, cheese, lettuce, tomato, and avocado (or whatever toppings you wish to use). 

Tuesday, March 11, 2014

Stuffed Peppers

Alex introduced me to these stuffed peppers, and I love them!  I've generally stayed away from stuffed peppers in the past, because I don't like foods that are tomato-sauce based; luckily, these don't contain any tomato products like most stuffed peppers do.  I also like this hearty meal, because it includes all major food groups. 


Stuffed Peppers
Recipe from Alex Diestler

Ingredients:
  • 3-4 bell peppers
  • 1 tube of sage sausage (I prefer Bob Evan's)
  • 1 1/2 cups barley (or rice)
  • 1 1/2 cups shredded mozzarella cheese
Directions:
  1. Cook barley or rice. 
  2. Slice bell peppers in half length-wise, and remove pit and seeds. 
  3. In a large non-stick pan, cook sage sausage and drain oil. 
  4. Mix the cooked sausage, cooked barley, and half the shredded cheese in a large mixing bowl.  Place mixture into each bell pepper half (facing up). 
  5. Add remaining cheese on top of each stuffed pepper. 
  6. Bake at 375 degrees for 25-30 minutes, or until cheese starts to crisp. 

Response to the Meatloaf Incident

You may recall my recent post about the Meatloaf Incident of 1988, and my story of survival.  My sister (the villain) happened upon my account of this tragedy, and wanted to share her side of the story.  Where the truth lies?  We may never know . . .

Such drama, such intrigue, such ..... lies! In truth, it was not a slice of dogloaf, but a delicious homemade cookie from the kitchen of Jane Doe*  that I so selflessly shared with my one sister.  
Mrs. Doe had just whipped up a fresh batch when we were entered her home. Imagine our disappointment when we learned that her hubby, John Doe*, was taking nearly all of the precious morsels to a scouting activity later that evening. Only 7 cookies remained after he plundered the treasure trove of taste. 
Jane had promised Amy and I, as well as each of her 4 children, a cookie, with one remaining for herself. We would be rewarded the sweet treat after we finished the aforetomentioned dogloaf. Being the extremely picky eater that Amy was, she remained at the table, refusing to eat the strange invention that is meat in bread form. As an act of solidarity, I remained with her, having finished my serving of Alpo ages ago, a cookie resting quietly on the napkin before me. 
Suddenly, in a fit of what can only be described as rabid rage, the Doe's albino bunny rounded the corner of the kitchen entrance, jumped up on the table, and in one second had devoured Amy's remaining foodstuffs. As soon as it happened, it was over (as things often are after they happen). We were left stunned, shocked and fearing for our very lives. Within moments Jane came in the kitchen, took one look at Amy and her empty plate, and one look at the villianous rabbit and frowned. "I see you've fed your portion of my delicious delicacy to the rabbit. There will be no cookie for you after all." And with that, she picked up the last remaining cookie and shoved it in her mouth, emitting a loud cackle and giving Amy a glare that only Mr. Barrow could rival. 
I watched as Amy, heartbroken and cookieless, began to emit large, wailing sobs. Robbed of dinner, dessert and her very dignity (it seemed), she was inconsolable. It was then that I made a selfless decision that would come to haunt me the rest of my precious life. I lifted my prized possession and handed it to my grieving sister. "Here Amy" I said. "You take it. I know how much Jane's cookies mean to you. They mean so very much to me." Amy stopped wailing, looked at me with eyes brim with tears and said "You mean, you'd do that for me?" We embraced and the cookie was soon eaten. "I'll never forget what you did for me, MoEsha*. You truly are the best big sister that a girl could have." 
The rest of the evening was a blur. I remember that Amy followed me around like a puppy dog, refusing to leave my side. She thanked me again and again. Years (4) of tension and teasing and jealousy had been healed. We were starting anew. We were kindred spirits. Nothing could get in our way.
Within a few hours, our parents arrived, graciously thanked a still fuming Jane, and buckled us in our car seats. Amy and I held hands in the back seat. "How was dinner?" they asked, warily. "Did you eat ALL your food?" Amy turned to me, smiled and replied "MoEsha made me eat all her meatloaf and then stole my cookie!"

*Names have been changed to protect the not-so-innocent

Chicken a la King

This is my all-time favorite, home cooked meal.  Anytime you can incorporate a pastry into dinner, I consider it a win.  This recipe was created by my good friend and former college roommate, Lauren.  I post many recipes from her blog, as she is a genius in the kitchen. 

I made these for my father-in-law a few months back, and he raved about them also.  This was no small feat as my FIL isn't one to hand out compliments willy-nilly.  It was then that I knew I had been accepted into the Diestler tribe.  :-)


Chicken a la King

Ingredients:
  • 6 whole Puff Pastry Shells (In the freezer aisle, next to the Cool Whip and frozen fruit)
  • 2 Tablespoons Butter
  • ½ cups Minced Onion Or Shallot
  • 2 Tablespoons All-purpose Flour
  • 1 cup Chicken Broth
  • ¾ cups Heavy Cream
  • ⅛ teaspoons Poultry Seasoning
  • 1 pinch Ground Thyme
  • Salt And Pepper, to taste
  • 1-½ cup Shredded Chicken
  • 1-½ cups Frozen Vegetables Of Your Choice
Directions:
  1. Bake puff pastry shells according to package directions.
  2. In a medium saucepan over medium heat, melt butter and saute onions until tender, 3-5 minutes. Stir in flour and cook 1 minute. Increase heat to medium high. Slowly whisk in chicken broth. Let the sauce come to a boil to thicken. Reduce heat to medium low and stir in cream, poultry seasoning, thyme, salt, pepper, chicken, and vegetables. Keep warm on the stove top until ready to serve.
  3. To serve, remove the center of a puff pastry shell and pour in the mixture.