Tuesday, February 25, 2014

Chicken Taquitos


I made these taquitos a few years ago, and when we were about to sit down and eat them, the tornado sirens went off, and we rushed to the half-bath with our puppy.   The storm passed about 30 minutes later, but it was pretty scary - as the tornado touched down about a block away from us. 

After the storm passed, we nervously ate our dinner.  Because it was such a scary ordeal, I don't think we fully appreciated what we were eating.  Fast forward a few years, and I decided to whip these up again, and they were fabulous!  Alex had the leftovers for lunch, and loved them!


Chicken Taquitos

 Ingredients:
  • 1/3 C (3 oz) cream cheese
  • 1/4 C green salsa
  • 1T fresh lime juice
  • 1/2 t cumin
  • 1 t chili powder
  • 1/2 t onion powder
  • 1/4 t granulated garlic, or garlic powder
  • 3 T chopped cilantro
  • 2 T sliced green onions
  • 2 C shredded cooked chicken
  • 1 C grated pepperjack cheese
  • 12 small corn tortillas 
  • salt
  • cooking spray
Directions:
  • Heat oven to 425. Line a baking sheet with foil and lightly coat with cooking spray. Heat cream cheese in the microwave for about 20-30 seconds so it’s soft and easy to stir. Add green salsa, lime juice, cumin, chili powder, onion powder and granulated garlic. Stir to combine and then add cilantro and green onions. Add chicken and cheese and combine well. You can prepare up to this step ahead of time. Just keep the mixture in the fridge.
  • Work with a few tortillas at a time and heat in the microwave until they are soft enough to roll without cracking. It helps to place them between damp paper towels. Usually 20-30 seconds will do it. If you find yours are cracking when you roll them or are coming unrolled right away, just try heating them longer and try the paper towel thing.
  • Place 2-3 T of chicken mixture on the lower third of a tortilla, keeping it about 1/2 inch from the edges.  Roll up tortillas and place seam down on a baking sheet, not touching one another. 
  • Spray lightly with cooking spray, or lightly brush with olive oil and sprinkle lightly with kosher salt.  Place pan in oven and bake for 15-20 minutes or until crisp and the ends start to get golden brown.  Remove from oven and let cool slightly before serving. 
  • These taste fabulous when dipped in Creamy Lime Cilantro Dressing.

Gooey Butter Bars

I had never heard of Gooey Butter Bars until Janet (Alex's mom) brought them over for dessert one night with the missionaries.  Alex and I were on a diet that allowed for one sweet a day, and it was agonizing to only have one piece each day, when we wanted to gobble up the whole pan.  I never thought I'd like a non-chocolate dessert so much.  :-)

Apparently, Gooey Butter Bars are kind of a Midwest thing.  They originated in St. Louis, and are still a local favorite there.  


Gooey Butter Bars
Recipe from Janet Diestler.

Ingredients:
  • 1 package Pound Cake mix (Dromeday works best)
  • ½ cup butter (melted and cooled)
  • 2 eggs
  • 8 oz cream cheese (softened)
  • 2 additional eggs
  • 1 lb powdered sugar
  • 2 tsp vanilla
  • sliced almonds
Directions:
  1. To make cake base, beat 2 eggs into melted butter (cool) and add dry cake mix. Mix well with wooden spoon. Spread into greased 9 x 13 pan. 
  2. Beat cream cheese and 2 additional eggs together and add powdered sugar and vanilla. Pour mixture over cake base and sprinkle with almonds. 
  3. Bake at 350 degrees for 40-50 minutes. 
  4. When cooled, sprinkle with powdered sugar. 
  5. These are best when allowed to cool in refrigerator overnight. They also freeze well. 

My Favorite Chopped Salad


I really like chopped salads.  There are a million different variations, but this combination of ingredients is my favorite.  This is very similar to a delicious salad at one of my favorite restaurants, Redstone Grill. 


My Favorite Chopped Salad

Ingredients:
  • Mixed Greens
  • Rotisserie Chicken
  • Bacon
  • Grape Tomatoes
  • White Raisens
  • Corn
  • Cornbread Croutons (see instructions below)
  • Honey-Lime Dressing (see recipe below)
  • Blue Cheese Crumbles (optional)
Directions:
For the salad dressing, whisk the following ingredients together:
  • 1/2 Cup Lime Juice
  • 1/4 Cup  Honey
  • 1/8 Cup Extra Virgin Olive Oil
  • 1/8 Cup Canola Oil
  • Pinch of Salt 
For the croutons, cube cornbread into 1-inch chunks; lightly toss cubes in a few tablespoons of Canola oil, and salt.  Place on a greased cookie sheet, and bake at 400 degrees, for 10-15 minutes until golden brown, turning over half-way through. (Note: I usually freeze a few slices of left-over cornbread, and then thaw to make these croutons for salad)

Better-Than-Sex Cake

Alex asked me to make him Better-Than-Sex Cake for his birthday a few weeks ago (should I be offended by that?).  I had had this cake in the past and always liked it, but never thought it was anything to write home about it. 

Being the good wife I am, I did a search for the perfect recipe, and came across this one.  I think the key is to use a combination of caramel sauce and sweetened condensed milk (rather than just sweetened condensed milk as most recipes call for).  The result was spectacular, and we all loved it.  It didn't last long. 

Great choice, Honey! 


 Better-Than-Sex Cake (but not really)
Slightly adapted from this recipe on AllRecipes.com.

Ingredients:
  • 1 package Duncan Hines devil's food cake mix
  • 3/4 cup sweetened condensed milk
  • 3/4 cup caramel ice cream topping
  • 1 cup chocolate covered toffee, chopped (I use the Heath baking chips sold by the chocolate chips)
  • 1 (8 ounce) container frozen whipped topping, thawed
Directions:
  1. Bake cake according to package directions for a 9x13 inch pan; cool on wire rack for 5 minutes. Poke holes across the top of the cake with a kabob skewer or end of a wooden spoon, making sure not to go through to the bottom.
  2. In a saucepan over low heat, combine sweetened condensed milk and caramel topping, stirring until smooth and blended. Slowly pour the warm topping mixture over the top of the warm cake, letting it sink into the holes.
  3. Let cake cool completely, then top with whipped topping. Decorate the top of the cake with chocolate toffee chips. Refrigerate and serve right from the pan.

Utah Scones


I think we all have certain tastes that remind us of home.  For me, its scones.  We had these at various moments throughout my childhood - I remember having a scone eating contest with my cousin at Chuk-a-rama, and I think I seriously ate about a dozen (and I was probably only 8 or 9 years old at the time!).  My friend's mom down the street used to make them too, and I always loved popping through SconeCutters drive-thru (a fast food chain in Utah) for a honey butter scone.  We didn't eat them much (thankgoodness for my health), but when we did have them, they were a real treat.

When I went on my internship to Seattle, I frequented Starbucks. I noticed that they had scones on their menu, but they were more like a biscuit.  I thought it must just be a Starbucks thing.  Then, I went to Europe on a study-abroad program, and saw the same thing.  Through my travels I learned that only Utah calls this fried piece of a heaven a scone.  After scouring the inter-webs for a recipe, it seems every good Utahn has had this experience - a "scone" awakening so to speak. 

So for simplicities sake, people outside of Utah call these "Utah Scones."  Whatever you call them (elephant ears, sopapillas, beignets), they're divine!  Give 'em a try . . . but only once every few years.  Seriously, these are not a health food.  :-)


Utah Scones

Ingredients: 
  • 1 cup warm water
  • 1 cup warm milk
  • 1 Packet active dry yeast
  • 3 Tbsp. granulated sugar
  • 1/4 cup melted butter, cooled
  • 1 Tbsp. salt
  • 5 – 6 cups bread flour
  • Vegetable oil for deep frying*
Directions:

Combine warm water and warm milk.  Stir in the sugar.  Add quick rise yeast and stir lightly.  Allow yeast to activate, about 10 minutes.  In a stand mixer, fitted with a bread hook, add milk mixture and melted cooled butter.  Add the salt.  Start the mixer and add the flour one cup at a time until the dough pulls away from the sides of the bowl.  Dough should be slightly sticky but workable.  Cover the dough in the bowl with a towel.  Set in a warm place and allow raise until double.

Pour your oil in a large pan (with sides deep enough to fully immerse the scones) or a deep fryer and heat slowly over medium to medium high heat.  While the oil is heating, roll the dough out onto the counter, without flour, into a large rectangle about 1/2 inch thick.  You may choose to butter the counter lightly.  Using a pizza cutter, cut into squares or triangles.

Heat oil to between 375 degrees and cook scones until golden brown - you will need to flip them half way through cooking, about a minute on each side.  Serve immediately.

*We used vegetable oil as directed, but I think the flavor of the oil got in the way of the taste.  Next time I would use canola oil, as its a bit more mild. 

Sausage Rolls

Alex's parents were both born in England, so many of his favorite foods have a British influence. I have loved being introduced to some great recipes along the way. 

This one came from Janet, Alex's mother.  She always makes Sausage Rolls around Christmastime, and I look forward to them every year.  One busy day, I remember her patiently teaching Alex and me how to make them after work.  Definitely a favorite around here.


Sausage Rolls
Recipe from Janet Diestler

Ingredients:
  • 1 box Frozen Puff Pastry Sheets (2 Sheets per box)
  • 1 tube Sage Sausage (Bob Evan's is the best)
  • 1 Egg
  • Flour for dusting
Directions:
  1. Thaw puff pastry as per package directions.  Split each sheet along fold lines - making three rectangles per sheet (6 total, between the two sheets). 
  2. Lightly flour counter-top and rolling pin.  Gently roll each puff pastry rectangle, to extend size about an extra centimeter on each side.  Set aside.
  3. Split sausage into six equal portions.  Lightly flour counter-top surface and roll out each sausage piece like a snake, until it meets the length of puff pastry rectangles. 
  4. Fold puff pastry rectangle around sausage, and seal dough with a fork (you may wish to smear a few drops of water along the edge to hold it's seal).  
  5. Lightly tap the sealed end with the edge of a knife at an angle.  
  6. Brush beaten egg on top of each roll. 
  7. Cut each roll into 2 inch increments (about six per roll).
  8. Cut a few slats on top of each roll for ventilation. 
  9. Bake per Puff Pastry instructions.

Lauren's Cinnabon Cinnamon Rolls


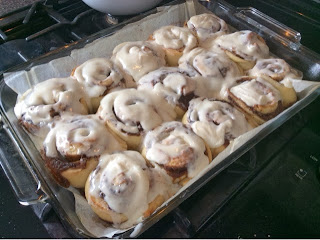
On Sundays, we like to serve breakfast foods for lunch -- I guess you could call it brunch.  We don't eat warm breakfasts during the week, so its a fun tradition that my parents started when I was a child and we'd come home starving from church.  These cinnamon rolls hit the spot, and were probably some of the best I've ever had.  

I let the dough do the first rise, then rolled them out into cinnamon rolls and placed them immediately in the fridge overnight.  The next day, I pulled them out of the fridge to do the second rise.  It took a long time to rise (like 4 hours), so I think I may take Lauren's suggestion and double the yeast next time. 


Lauren's Cinnabon Cinnamon Rolls

Ingredients:

for the dough-
  • 3/4 cup warm water
  • 2 1/4 teaspoons active dry yeast {use the fast acting kind!}
  • 1/2 cup granulated sugar
  • 1 teaspoon salt
  • 1/4 cup buttermilk, at room temperature
  • 1 egg
  • 1/3 cup canola or vegetable oil
  • 4 1/2-5 cups all purpose unbleached flour
for the filling-
  • 1/2 cup softened margarine
  • 1 1/4 cups packed light brown sugar
  • 2 1/2 tablespoons ground cinnamon
  • 2 tablespoons cornstarch

for the frosting-
  • 2 oz. cream cheese, at room temperature
  • 1/4 cup softened margarine
  • 1 teaspoon vanilla extract
  • 1/2 tablespoon corn syrup
  • 1 teaspoon fresh lemon juice
  • 1 1/4 cups powdered sugar
Directions:

Making the Dough- In the bowl of a stand mixer fitted with a dough hook, pour in water, yeast and 1 tablespoon of the granulated sugar. Stir and proof 5 minutes. Once mixture looks bubbly and frothy, pour in remaining sugar and salt. Stir on low for 15-20 seconds. In a small bowl, measure buttermilk, oil and egg. Whisk ingredients together until egg is incorporated to other two ingredients. Pour contents into the water and yeast mixture. Stir another 20 seconds in the mixer. Pour 2 cups of flour into mixer and stir on low until incorporated. Sprinkle flour in by 1/4 cup increments until dough cleans the sides and bottom of the bowl. Dough should be sticky but not sticky enough to stick to your hands when touched. Once it has reached this stage, turn mixer on and knead for 5 minutes. Remove dough from bowl, grease and replace back into same mixing bowl {since it's practically clean anyways.} Cover with plastic wrap and a dish towel. Rise 1-2 hours or until dough has doubled in size.

Filling and Cutting Rolls- In a medium size bowl, stir brown sugar, cinnamon and cornstarch together until combined. Set aside. Punch down dough. Flour a large clean table liberally with flour. Lightly flour dough as well. Roll dough out to be a 20x30 rectangle {or as close to that as possible} while moving dough around to ensure it's not sticking to your work surface. If it's a little short or uneven, feel free to cut off the edges to even it all out. {FYI-I cut off some dough on one side and filled in a spot that needed more dough on the other side to make a more even rectangle.} Spread softened margarine over dough, being sure to go right to the edges leaving a 1-inch strip untouched on one of the longer sides of dough. Dump brown sugar mixture onto the middle of the dough and spread with your hands, creating an even layer over top of the margarine, still leaving that 1-inch strip of dough untouched. If you have any filling that falls off the sides of the dough, use a bench scraper to replace. Lightly press the sugar mixture into the margarine using a rolling pin. Roll the dough up into a tight log, finishing with the plain dough on the bottom to seal the entire thing together. Cut off the uneven ends to even out the log. Score log every 2 inches and then slice your rolls using those marks. Place into parchment paper lined, margarine greased pans. 12 into a 9x13, 3 remaining into a loaf pan, or 8x8 with the small ends. Cover pans with plastic wrap and dish towels. Let rolls rise another 1-2 hours or until they are touching and have risen almost double. My rolls always spread out more than up, so just be aware that they will most likely spread out more than up. Bake in a preheated 350 degree for 17 minutes, or until tops start to brown. Watch them carefully!!

For the Frosting- While the rolls are baking, whip cream cheese and margarine together. Stir in vanilla, corn syrup and lemon juice. Scrape sides and mix again. Pour in powdered sugar and stir slowly until it starts to incorporate. Then mix on high for 5 minutes or until frosting starts to lighten in color. Scrape sides and mix again briefly. Once rolls have been removed from the oven, frost using half the amount made. Then after they have cooled a few more minutes, frost again with remaining frosting. The first frosting will melt down into the rolls and the second layer should stay put. Serve warm.

Sweet & Sour Meatballs

This is one of our favorite dishes, and is regularly included in our meal rotation.  A quick, week-night meal, and we most always have all the ingredients on hand.  We always serve it over barley. 

Also, did you know that you can buy frozen onions already chopped up?  Major time and tear saver! 


Sweet & Sour Meatballs
Adaptation of this recipe from Lauren's Latest

Ingredients:
  • 1 cup ketchup
  • 1/2 cup water
  • 1 teaspoon salt
  • 2 teaspoons yellow mustard
  • 1 clove garlic, minced
  • 2 tablespoons finely chopped onion
  • 1 1/2 tablespoons Worcestershire sauce
  • 1/4 cup packed brown sugar
  • pepper to taste
  • 15-20 cocktail frozen meatballs (Sam's Club's are the best!)
Directions:

In bowl or measuring cup, mix together all ingredients for sweet and sour sauce. Pour sauce into hot pan, and add frozen meatballs. Cover and simmer on low heat for at least 15-20 minutes. Serve over hot rice or cooked barley.

Cauliflower Pizza Crust

I am not a fan of cauliflower.  I think it stinks, like cabbage.  I'm also not a fan of cabbage.

Anyways, I've been trying to fit in more veggies, and I had once sampled a gluten-free pizza using cauliflower as the crust.  The idea sounded terrible, but the end result was actually very good.  So, I decided to give it a try.

As every recipe I found instructed, I ground up the cauliflower, microwaved it, and added the additional ingredients.  What I got was a tiny little ball of a crumbly and extremely wet consistency.  No way would this roll out to a full size pizza, and even when I tried, it was a mess!  It wouldn't hold together.

So, I decided to add a little flour to make it hold its shape.  While this isn't gluten-free, it did turn out great -- and we added another veggie to our diet for the win!  Alex liked the taste, but didn't feel like it was as filling as regular crust pizza - so you may want to add a few sides.


Cauliflower Pizza Crust

Ingredients: 
  • 2 ½ cups grated cauliflower (about 1 head)
  • 1 large egg, lightly beaten
  • 1/2 cup shredded cheddar cheese
  • 2 tablespoons grated Parmesan cheese
  • salt to taste
  • Pinch of dried basil
  • 1/2 cup flour

Directions:
  1. Heat oven to 425 degrees.
  2. Grate the cauliflower using a cheese grater or food processor. Place in a large bowl and microwave for 7-8 minutes, or until soften. Remove and let cool. 
  3. Put mixture in paper towel, and try to drain out any excess moisture. 
  4. Mix in the egg, cheddar, Parmesan cheese, flour, dried basil flakes, and salt. Once combined, pat onto a piece of parchment paper. Place directly onto cookie sheet, spray lightly with non-stick spray, and bake for 10-15 minutes, or until golden.
  5. Top the pizza with desired toppings (I used pizza sauce, mozzarella, sausage, tomato, and bell pepper). Bake in the oven until melted and bubbly, another 10 minutes. Top with basil before serving.  

Monday, February 24, 2014

Yorkshire Pudding

While dating Alex, he always mentioned his love for Yorkshire pudding when eating a Sunday roast. I wasn't sure how I felt about serving something of a pudding consistency with a savory meat (I was thinking of the Jell-O variety), and the thought kind of grossed me out.

A few years after we married, we went to England for a wonderful two week vacation with my mother-in-law, Janet.  Our first meal there was at an incredible restaurant-chain called, "The Carvery." They have some sort of meat at a carving station (turkey, ham, etc.), and then all-you-can-eat sides.  One of which, is Yorkshire Pudding.  Imagine my surprise when I wasn't served a jiggly, custard-like side, and more of a pop-over!  They were delicious and it was love at first bite.


While on that trip, Janet introduced me to the frozen puddings you could buy at the local grocery store, Tesco.  We (mostly me) went through many bags, and they soon became one of my favorite British treats.


So, I did some research and whipped these bad-boys up.  Traditional Yorkshire pudding is made using beef drippings from a roast, but you can use canola oil if that isn't readily available (in fact, I looked up the Tesco Frozen puddings online, and they use rapeseed oil --- or as we like to call it in America, canola oil). 

I also couldn't find the Yorkshire pudding pans that Alex has, so I made them in a Whoopie pie pan - turned out perfect!  You can also use a muffin pan.


Yorkshire Pudding
Adapted from this recipe on allrecipes.com.   

Ingredients:
  • 1 1/2 cups all-purpose flour
  • 3/4 teaspoon salt
  • 3/4 cup milk, room temperature
  • 3 eggs, room temperature
  • 3/4 cup water
  • 1/2 cup beef drippings or Canola Oil

Directions:
  1. Mix flour and salt together until blended. Make a well in the flour, add the milk, and mix until consistent. Beat the eggs into the batter. Add water and beat again until the mixture is light and frothy, about 2-3 minutes. Set aside for an hour (or, if it's the day before, cover in the fridge overnight).
  2. If the batter has been refrigerated, allow it to come up to room temperature before using.
  3. Preheat oven to 400 degrees F (205 degrees C).
  4. Put a pea-sized amount of beef drippings or canola oil in each muffin cup.  Put the pan (with the oil only) in the oven, and heat to a sizzle (this only take about 5 minutes with beef drippings, but 10-15 minutes with canola oil).  Pour the batter over the sizzling oil and bake for 20-30 minutes (or until the sides have risen and are golden brown). Do not open the oven to peak during baking time. 

Wheat Bread

One of my goals this year is to make more food from scratch.  I recently read an article about store-bought bread being so heavily processed, that even the whole-wheat stuff is bad for you.  I used to buy bread from Great Harvest to get away from all that bad stuff, but that became expensive and time-consuming (the nearest location is two towns over).

As such, I decided to try my hand at homemade wheat bread.  I scoured the internet looking for top-rated recipes, and this one is featured on allrecipes.com as a favorite.  I must say, I was not dissapointed!  This bread is easy and delicious, especially right out of the oven.  It keeps for 7-10 days, and freezes well.

A few tips for making yeast bread:

  1. You want to dissolve the yeast in warm water, like the the tempature of baby bath water - not too hot, but not uncomfortable to touch (thanks to Lauren from Lauren's Latest for that tip!).
  2. I always use quick-rise yeast.  
  3. The yeast will rise much faster if you set the bowl and bread pans on top of a heating bad, low-setting.
  4. The dough should be slightly sticky, but not enough to leave a residue on your hands while kneading.    I usually end up using less flour than any recipe calls for. 


Wheat Bread 

Ingredients:
  • 3 cups warm water
  • 2 (.25 ounce) packages active dry yeast
  • 1/4 cup honey
  • 4 cups bread flour
  • 3 tablespoons butter, melted
  • 1/8 cup honey
  • 1 tablespoon salt
  • 4 cups whole wheat flour
  • 2 tablespoons butter, melted

Directions:
  1. In a large bowl, mix warm water, yeast, and 1/4 cup honey - let sit for 5-10 minutes until frothy. Add 4 cups white bread flour and 1 cup wheat flour, and stir to combine. Let set for 30 minutes, or until big and bubbly.
  2. Mix in 3 tablespoons melted butter, 1/8 cup honey, and salt. Stir in 2 cups whole wheat flour. Flour a flat surface and knead with whole wheat flour until not real sticky - just pulling away from the counter, but still sticky to touch. This may take an additional 2 to 3 cups of whole wheat flour. Place in a greased bowl, turning once to coat the surface of the dough. Cover with a plastic wrap. Let rise in a warm place until doubled (about 1 hour).
  3. Punch down, and divide into 2 loaves. Place in greased 9 x 5 inch loaf pans, and allow to rise until dough has doubled (about 1 hour).
  4. Bake at 350 degrees F (175 degrees C) for 25 to 30 minutes; do not overbake. Lightly brush the tops of loaves with 2 tablespoons melted butter when done to prevent crust from getting hard. Cool completely.

Garden Ranch Pizza

My sister made this yummy pizza for me when I was visiting her in Pittsburgh. Ever since then, I have been hooked! This is a great way to fit your veggies in, without even knowing it.  This is the dish that converted me to tomatoes. 


Garden Ranch Pizza

Ingredients:
  • 1 Pizza Crust (I use this recipe, only changing 1/2 the bread flour to wheat)
  • 1/3 C. Light Mayo
  • 1 Tbsp. Ranch Dressing Mix
  • 2 C. Mozzarella Cheese, grated
  • 1/2 C. chopped Broccoli
  • 1/4 C. sliced Carrots
  • 1/2 C. diced Tomatoes
  • 1 Cup cubed Chicken
Directions:
  1. Preheat oven to 425°F.
  2. Combine mayonnaise and ranch seasoning. Spread evenly over crust.
  3. Sprinkle on half the mozzarella. Layer on all the vegetables and chicken. Top with the remaining mozzarella.
  4. Bake 18-22 at 425°F minutes or until pizza crust is cooked. Serve immediately.

Amy's Rating: 10/10
Alex's Rating: 9/10